I'm borrowing this from S10crewcab.com. It seems to be neededin a few of the forums with so many not dropping there dizzy back in the right way. I believe the year the S-Series started using this type dizzy was 96. I can be wrong. Maybe one of the mods/admins can edit it for better accuracy.
Distributor Replacement Removal ProcedureThere are two procedures available to install the distributor:
Use Installation Procedure 1 when the crankshaft has NOT been rotated from the original position.
Use Installation Procedure 2 when any of the following components are removed:
•The intake manifold
•The cylinder head
•The camshaft
•The timing chain or sprocket
•The complete engine .•
If the malfunction indicator lamp (MIL) turns on and DTC P1345 sets after installing the distributor, this indicates an incorrectly installed distributor. Engine damage or distributor damage may occur. Use Procedure 2 in order to install the distributor1. Turn OFF the ignition.
2. Remove air cleaner assembly.
3. Remove the spark plug wires from the distributor cap.
Twist each spark plug boot 1/2 turn.
Pull only on the wire boot in order to remove the wire from the distributor cap.
4. Remove the electrical connector from the base of the distributor.
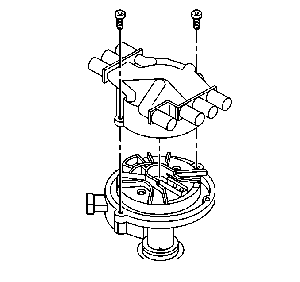
5. Remove the two screws that hold the distributor cap to the housing.
6. Remove the distributor cap from the housing.

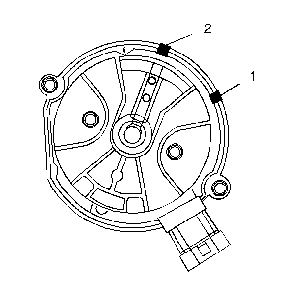
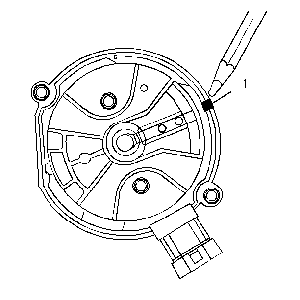
7. Use a grease pencil in order to note the position of the rotor in relation to the distributor housing (1).
8. Mark the distributor housing and the intake manifold with a grease pencil.

9. Remove the mounting clamp hold down bolt.
10. Remove the distributor.
11. As the distributor is being removed from the engine, watch the rotor move in a counter-clockwise direction about 42 degrees. This will appear as slightly more than 1 clock position.
12. Note the position of the rotor segment.
13. Place a second mark on the base of the distributor (2). This will aid in achieving proper rotor alignment during the distributor installation.
Installation Procedure 1
1. If installing a new distributor assembly, place 2 marks on the new distributor housing in the same location as the 2 marks on the original housing.
2. Remove the new distributor cap, if necessary.
3. Align the rotor with the second mark (2).

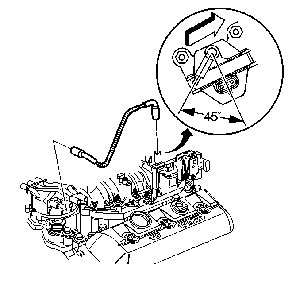
4. Guide the distributor into the engine.
5. Align the hole in the distributor hold-down base over the mounting hole in the intake manifold.
6. As the distributor is being installed, observe the rotor moving in a clockwise direction about 42 degrees.
7. Once the distributor is completely seated, the rotor segment should be aligned with the mark on the distributor base (1).
•If the rotor segment is not aligned with the number 1 mark, the driven gear teeth and the camshaft have meshed one or more teeth out of alignment.
•In order to correct this condition, remove the distributor and reinstall the distributor.
Use the correct fastener in the correct location. Clean any residual thread locking compound from the threads. Use the correct tightening sequence and specifications when installing fasteners in order to avoid damage to parts and systems. 8. Install the distributor mounting clamp bolt. Tighten Tighten the distributor clamp bolt to 25 N·m (18 lb ft).

9. Install the distributor cap.
10. Install two clean distributor cap screws. Tighten Tighten the screws to 2.4 N·m (21 lb in).
11. Install the electrical connector to the distributor.
12. Install the spark plug wires to the distributor cap.
13. Install the ignition coil wire. Note the correct orientation of the wire boot.
If the malfunction indicator lamp (MIL) is turned ON after installing the distributor, and a DTC P1345 is found, the distributor has been installed incorrectly. 14. Refer to installation procedure 2 if malfunction indicator lamp is turned ON after installing the distributor.
Continued in post 2.


